Contents

Planning wood with a router is an excellent way of surfacing large slabs of wood, or unevenly shaped cross-sections of wood. Well, a planner can do the job but will consume a lot of your time and energy, especially if handling a wide piece of wood slab. The most efficient way is to use the best wood router and a jig. This way, you will achieve a perfectly flat surface in a short time. Here is a guide to help you surface your timber slabs using a wood router.
[su_divider top=”no” style=”default” divider_color=”#444″ size=”3″ margin=”15″ class=””]
[su_dropcap style=”flat” size=”2″ class=”” dropcap_color=”#fa5738″]1[/su_dropcap]
Step: Plan the jig and the fixture
[su_divider top=”no” style=”default” divider_color=”#444″ size=”3″ margin=”15″ class=””]
The first step before planning your piece of wood is to build the jig and the fixture. The fixture will hold your wood in position and has two rails on which the jig will move. The jig provides an attachment point for your router. The jig (holding the router in place) slides along the fixture to make it easy for you to control the planning process. You want to take the measurements of the dimensions of your timber so that you can build a jig and fixture that can accommodate it. Measure the maximum width, length, and thickness of the slab.
[su_divider top=”no” style=”default” divider_color=”#444″ size=”3″ margin=”15″ class=””]
[su_dropcap style=”flat” size=”2″ class=”” dropcap_color=”#fa5738″]2[/su_dropcap]
Step: Start with the fixture
[su_divider top=”no” style=”default” divider_color=”#444″ size=”3″ margin=”15″ class=””]
The construction of the fixture must always match the piece or pieces of wood that you want to plane. The surfacing fixture of the router must have a base and two rails. Build the base to around half-inch in thickness, while the rails should contain two half-inch pieces of wood joined together (using glue) to make one-inch thick rails.
Fix the rails to the base such that you leave one and a half inches of space on the sides of the wood that you want to plane. Make the rails a bit taller than the thickness of the wood, but not by much. A quarter-inch above the surface of the lumber will suffice. Your wood will have irregularities on its surface. You want to build the rails such that they can accommodate these irregularities. Proceed to secure the rails firmly to the base using screws or glue.
[su_divider top=”no” style=”default” divider_color=”#444″ size=”3″ margin=”15″ class=””]
[su_dropcap style=”flat” size=”2″ class=”” dropcap_color=”#fa5738″]3[/su_dropcap]
Step: Then the Jig
[su_divider top=”no” style=”default” divider_color=”#444″ size=”3″ margin=”15″ class=””]
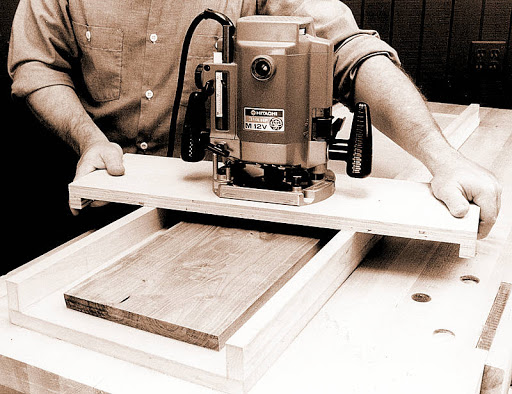
The jig consists of a taut piece of plywood. You want a piece of plywood with a wide-enough center to accommodate the mounting of the base of the router. The jig should be long enough such that when you position the router on one side of the fixture, the jig will still overhang and protrude beyond the opposite rail of the fixture. As a rule of thumb, the jig is better off too long than short.
Drill a hole on the central point of the plywood. This process will yield a lot of wood chips and dust, so it is good that you have enough clearance for the router bit.
Take a combo square and use it to streak lines at the edges of the hole. Use the lines as guides to position and predrill holes in which you will drive in four small screws in a box shape around the hole. Mount the screws, leaving the screw heads raised slightly. The screws serve to avert the side-to-side movement of the jig that may occur before the bits of the router can cut into the rails. The screw heads must not protrude out to the extent of accidentally engaging the lumber you want to plane.
Now install the router base onto the jig and then mount a wide bit or a mortising bit. A wider bit will complete the task much faster than a smaller bit.
[su_divider top=”no” style=”default” divider_color=”#444″ size=”3″ margin=”15″ class=””]
[su_dropcap style=”flat” size=”2″ class=”” dropcap_color=”#fa5738″]4[/su_dropcap]
Step: Use the Jig and the Fixture
[su_divider top=”no” style=”default” divider_color=”#444″ size=”3″ margin=”15″ class=””]
The initial step is to secure the stock into the fixture. You can achieve this through several methods, including using a carpenter’s tape, hot-melt glue or you can clamp wooden blocks against the edge of the stock. Position the wood you want to plane. Align the wood in a way that you will cut across the grain. This alignment minimizes the risk of tearing out strings from the fiber of the wood.
Position the router in such a way that it cuts about an eighth inch deep. Once the bit is clear of the stock, you can start routing. Start the router and hold the jig outside the rails. Proceed to rout in a straight pass across the lumber. Do not hold the router because this can cause the router to wonder a bit as you make your pass.
The depth you first select to cut is often an approximation because the surface of the wood is often uneven. This means that the bit will not touch each point for the first depth settings. Consequently, you will have to adjust the depth of the bits after each complete pass over the entire wood. Keep changing the bit depth until the whole wood surface is perfectly flat. When finished, flip the wood over and repeat the process; you want to create two flat surfaces. Once both surfaces are ready, you will need to sand them to do away with any marks caused by the machining process.
This is not a routine technique that you will use in day to day workshop operation. However, when the need to deploy the method arises, you cannot escape it. The technique is best for wide or thick pieces of wood. It is also great for working cross-sections of tree trunks that pose a challenge to handle using other machinery.