Contents

If you want to try your hand at DIY woodworking, making your own home windows is one way to go. With the building materials readily available online or your nearest home improvement store, window making has never been easy.
Plus, building your own windows from scratch allows you to save significantly on costs. Yet, to succeed in the project, you really have to master the principles. So below, we’ve shared a brief, yet, in-depth guide on how to make a window from scratch.
Tools And Materials
Here’s the list of the tools and materials required for the task:
[su_spoiler title=”Required Tools for this Project:” open=”yes” style=”simple” icon=”plus” anchor=”” class=””]
[su_list icon=”icon: arrow-circle-right” icon_color=”#4f8901″]
[su_row class=””]
[su_column size=”1/2″ center=”no” class=””]
- Table saw
- 2 x 1.5-inch by 2.5-inch woodblocks – such as redwood, cedar, or mahogany
- Measuring tape or measuring stick
- Waterproof wood glue
- Wood screws
- Finisher nails
- Plexiglass
[/su_column]
[su_column size=”1/2″ center=”no” class=””]
- 1-inch by 1-inch insect screen
- Spine roller
- Utility knife
- Window washing solution
- 15-grit sanding paper
- Newspapers
[/su_column]
[/su_row]
[/su_list]
[/su_spoiler]
Step-By-Step Instructions
For this guide, you will be learning how to make a small tilting window. Whilst the dimensions and some designs may vary, the principles remain the same. Therefore, even if you want to create a different window size and design, the steps will remain the same. In this case, the process is divided into two main components.
The first component involves building the actual window whilst the second step involves building a screen for the window. The third step is optional as it involves the painting process. You may opt to use prepainted wood pieces or choose to paint them after you are done with the building process.
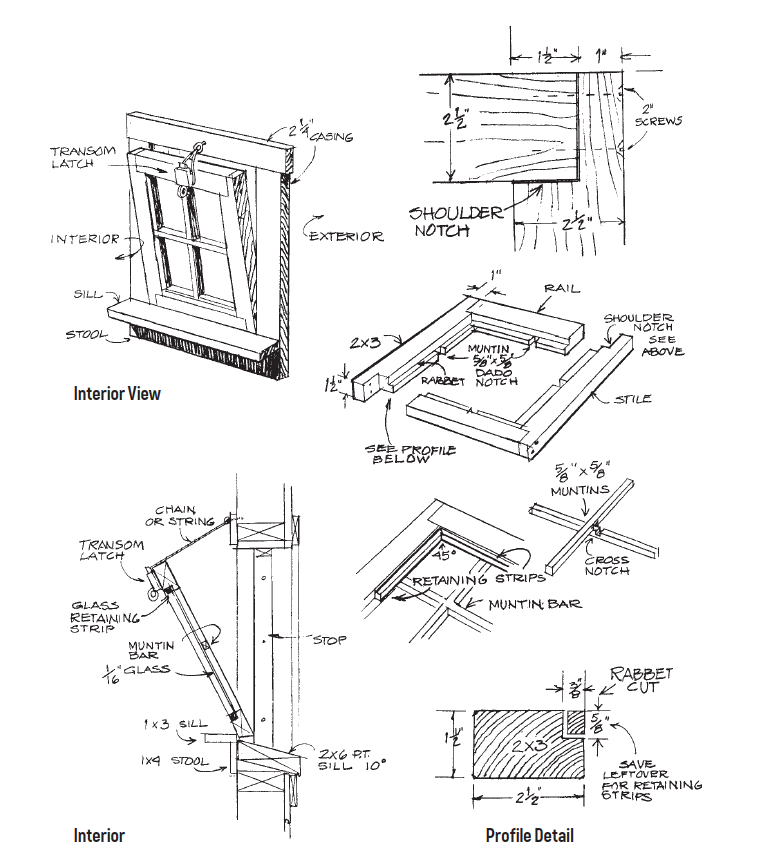
Step 1 – Building The Window
- To make your windows stand out more, you may want to add a few designs (this is optional). In this case, you want to use a wood router to create the designs you want on the wood pieces you will use to build the window.
- After the wood designing process, using a hand saw, cut four pieces of the woodblock (two pieces should measure 9.25 inches long and the other two should measure 18.25 inches long).
- On each piece cut out a groove that will act as a joint later on (the grooves should measure at least 0.375 inches by 0.625 inches)
- Using a clamp, hold the two 18.25 inch pieces together and on the edges, cut out a shoulder notch for support later on. The shoulder notch is typically created by putting the two pieces together in a perpendicular setup.
- On all four pieces, cut out the centers to measure 0.625 inches by 0.625 inches. This is where you will make the supporting strip for the window (sash bars).
- From the remaining large wood pieces, cut out two sash bars that measure 0.625 inches by 0.625 inches. Arrange them together in a crossing manner and hold them permanently using wood glue and screws.
- Cut out four small pieces of plastic (ideally plexiglass) each measuring 0.0625 inches. Each of the pieces of plastic should be fixed on the cutout area of the four wood pieces to be used as joints.
- Then, cut leftover wood pieces at a 45-degree angle and fit them to the joints of each wood piece to help hold down the plastic pieces.
- Using the table saw, trim the bottom edges of the window at a 10-degree angle to help the window properly fit on the base id the window.
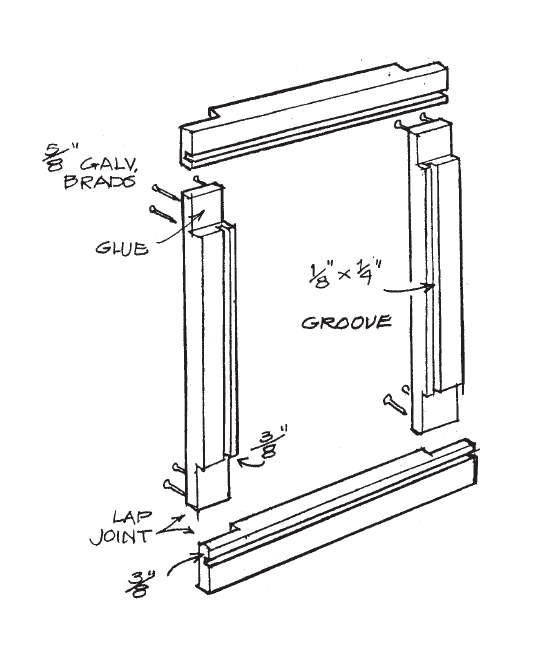
Step 2 – Building The Window Screen
The window screen is what goes into the window to complete it and aid with airflow whilst keeping out bugs. Similar to the window building process, you can opt for the design you want although basic principles remain the same.
- To start making the screen, you will need another wood piece. You can use the remaining large wood piece. Cut into the wood into four pieces each measuring 0.125 inches long by 0.25 inches deep (grooves) by 3/8 inches from the inside edges.
- Cut edge laps on each piece using a table saw – ensuring they all measure the same so joining them can be easy.
- Join the four pieces and hold them together using waterproof wood glue and finisher nails. Then, set them aside to dry,
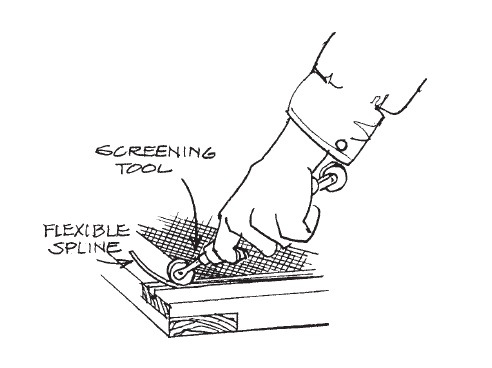
- After drying, install the insect screen on the frame using a spine roller – ensuring it is properly balanced. Use a utility knife to trim off any excess insect screen on the sides.
Step 3 – How To Paint A Window
- After installing the window, being the painting process.
- Clean the window using a window washing solution and cover the sash bars.
- Use 15-grit sanding paper to scrape the wood surfaces of the window, degloss the surface, prime it, and then, proceed to paint the windows.