Contents

Cutting curves, arcs, or complete circles out of wood is a skill that takes practice. Even experienced craftsmen often take many years to perfect the process and don’t always agree on which process or tool is best. Generally speaking, for curves starting at the outside of the board, the best tool for cutting is a band saw, especially if the wood is thick, since it can be easily adjusted while the blade stays straight. There is also a great way to get nice, even curves or complete symmetrical circles by using a circle cutting jig and a router by creating your own trammel wood compass. Let’s get started with this step-by-step guide on how to cut curves in wood with and without a router.
[su_spoiler title=”Required Tools for this Project:” open=”yes” style=”simple” icon=”plus” anchor=”” class=””]
[su_list icon=”icon: arrow-circle-right” icon_color=”#4f8901″]
[su_row class=””]
[su_column size=”1/2″ center=”no” class=””]
- band saw or jigsaw
- router with an adjustable point
- ply wood
[/su_column]
[su_column size=”1/2″ center=”no” class=””]
- sand paper
- drill with drill bits
- nail or thin rod
[/su_column]
[/su_row]
[/su_list]
[/su_spoiler]
How to Cut Curves in Wood a Router
[su_divider top=”no” style=”default” divider_color=”#444″ size=”3″ margin=”15″ class=””]
[su_dropcap style=”flat” size=”2″ class=”” dropcap_color=”#fa5738″]1[/su_dropcap]
Step
[su_divider top=”no” style=”default” divider_color=”#444″ size=”3″ margin=”15″ class=””]
[su_row class=””]
[su_column size=”1/2″ center=”no” class=””]
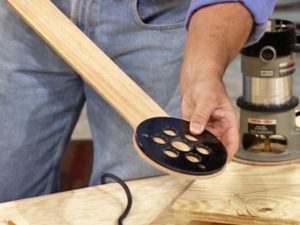
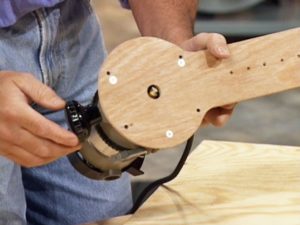
First, you must create your own circle cutting jig to use as a guide for cutting which will act as a trammel rod or beam compass. You will need to affix it to the router on one end that will swing and move around to cut and create a pivot point on the other from which the jig will curve around. To do this, remove the sub-base of the router to use as a gauge for the size of the circle. Cut a piece of 1/4” plywood into a circle that is the same size as the sub-base on the router. For instance, if your router base is a 4” diameter, cut a strip of plywood that is 4” wide and as long as you may need to create your circles or curves.
[/su_column]
[su_column size=”1/2″ center=”no” class=””]
[/su_column]
[/su_row]
[su_divider top=”no” style=”default” divider_color=”#444″ size=”3″ margin=”15″ class=””]
[su_dropcap style=”flat” size=”2″ class=”” dropcap_color=”#fa5738″]2[/su_dropcap]
Step
[su_divider top=”no” style=”default” divider_color=”#444″ size=”3″ margin=”15″ class=””]
[su_row class=””]
[su_column size=”1/2″ center=”no” class=””]
On one end of the strip of plywood, using the sub-base of the router that has been removed as your guide, mark onto the plywood where the holes line up to the sub-base. Use drill bits and a drill to begin to drill these holes. This will be the circular end of the jig where the router will be affixed. Round off the edges on this end of the plywood to fit against the router. For the router bit to move through the jig for cutting your curves, you will also need a hole drilled in the center of the part of the plywood that now lines up with the sub-base of the router.
[/su_column]
[su_column size=”1/2″ center=”no” class=””]
[/su_column]
[/su_row]
[su_divider top=”no” style=”default” divider_color=”#444″ size=”3″ margin=”15″ class=””]
[su_dropcap style=”flat” size=”2″ class=”” dropcap_color=”#fa5738″]3[/su_dropcap]
Step
[su_divider top=”no” style=”default” divider_color=”#444″ size=”3″ margin=”15″ class=””]
[su_row class=””]
[su_column size=”1/2″ center=”no” class=””]
Align the holes on the sub-base of the router with the holes drilled in the jig, and screw the circular end of the jig onto the base of the wood router using mounting screws.
[/su_column]
[su_column size=”1/2″ center=”no” class=””]
[/su_column]
[/su_row]
[su_divider top=”no” style=”default” divider_color=”#444″ size=”3″ margin=”15″ class=””]
[su_dropcap style=”flat” size=”2″ class=”” dropcap_color=”#fa5738″]4[/su_dropcap]
Step
[su_divider top=”no” style=”default” divider_color=”#444″ size=”3″ margin=”15″ class=””]
[su_row class=””]
[su_column size=”1/2″ center=”no” class=””]
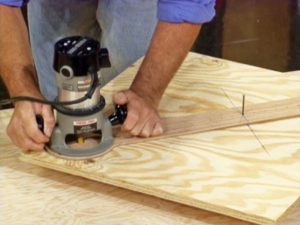
Now, it’s time to focus on the pivot end of the jig. Begin to drill pivot holes into the arm of the jig spacing them each about one-inch or a half-inch apart, depending on how big you want your circles or curves. If you are making a full circle cut, remember that the general rule of thumb is to space the holes half the distance of the diameter you want. For instance, if you want a 4” circle, you will space your trammel guide hole at 2” away from the center of the router sub-base.
[/su_column]
[su_column size=”1/2″ center=”no” class=””]
[/su_column]
[/su_row]
[su_divider top=”no” style=”default” divider_color=”#444″ size=”3″ margin=”15″ class=””]
[su_dropcap style=”flat” size=”2″ class=”” dropcap_color=”#fa5738″]5[/su_dropcap]
Step
[su_divider top=”no” style=”default” divider_color=”#444″ size=”3″ margin=”15″ class=””]
[su_row class=””]
[su_column size=”1/2″ center=”no” class=””]
All circles have a straight line at their core that runs through the center of it called a diameter, and half of this line is the radius that pivots around from the center point to remain constant around the entire circle. Before you can use the jig to cut the circle, you first need to determine the size and spacing of the radius. Draw a line on the wood from the center out to the end creating the radius you want, and center the router on top of the endpoint of this radius. Drive a nail through what will become the center of the circle, and set the router to the appropriate depth.
[/su_column]
[su_column size=”1/2″ center=”no” class=””]
[/su_column]
[/su_row]
[su_divider top=”no” style=”default” divider_color=”#444″ size=”3″ margin=”15″ class=””]
[su_dropcap style=”flat” size=”2″ class=”” dropcap_color=”#fa5738″]6[/su_dropcap]
Step
[su_divider top=”no” style=”default” divider_color=”#444″ size=”3″ margin=”15″ class=””]
Slowly pass through the wood with the router moving in a counter-clockwise direction on the outside, or the opposite direction when working with the inside of the circle, as the nail remains in place to use as a pivot point. As you make each cutting pass, begin to lower the router bit each time. Remember that the secret to making a nice, clean-cut with the router is to keep a constant, steady motion. If you stop repositioning it, you may get burn marks on the wood.
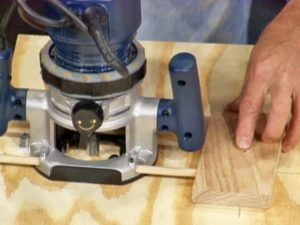
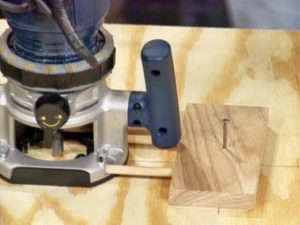
If you prefer not to damage the piece of wood by drilling the nail through it, use a thin piece of wood or other types of a rod placed between the wood you are cutting and the pivot point. Secure it with some heavy-duty two-sided tape. Without the nail securing the pivot pint, it will be a bit more tricky to get an even circle, so take your time and pay close attention to make sure it’s not swinging off-center. You may need to do the cutting pass more than once, so lower the bit slightly with each new pass.
Important safety tips:
[note]If you use a router that has a cord on it, be very careful not to cut through the cord as you pivot the router.[/note]
[su_spacer size=”20″ class=””]
How to Cut Curves in Wood without a Router
[su_row class=””]
[su_column size=”1/2″ center=”no” class=””]
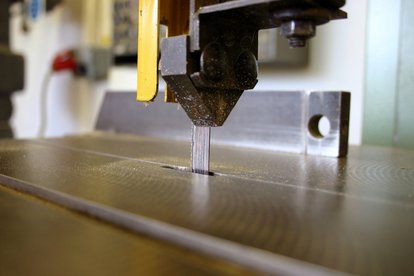
If you don’t have a router, or you prefer to use a specific type of saw, this will work best if you are needing curves cut starting from the outside of the piece of wood and not a complete circle.
If this is the case, you can use a template with a band saw or a jigsaw.
Or, you can use a hand plane and some precise measurement markings to use as a cutting guide.
[/su_column]
[su_column size=”1/2″ center=”no” class=””]
[/su_column]
[/su_row]
[su_divider top=”no” style=”default” divider_color=”#444″ size=”3″ margin=”15″ class=””]
[su_row class=””]
[su_column size=”1/2″ center=”no” class=””]
[su_dropcap style=”flat” size=”2″ class=”” dropcap_color=”#fa5738″]1[/su_dropcap]
Step
Either use a pre-cut template or French Curve set to lay flat against the wood to use as a guide for cutting. Look around the shop or your house for templates you already have, such as the base of a bucket or a metal paint lid. Or, use a trammel, beam compass or string secured to the center point with a pencil on the other end to begin marking the lines or points where you will begin cutting.
[/su_column]
[su_column size=”1/2″ center=”no” class=””]
[su_dropcap style=”flat” size=”2″ class=”” dropcap_color=”#fa5738″]2[/su_dropcap]
Step
Start marking the point where you want the curve to begin and end using a pencil. Remember that sometimes a curve begins by measuring out a square and then rounding out the points with precise measurements. If you want a perfectly symmetrical piece, mark out a half-circle starting with a straight line for the diameter of the circle and creating a curve with a trammel or wood compass for the template, and then flip it along that line to complete the other half.
[/su_column]
[/su_row]
[su_row class=””]
[su_column size=”1/2″ center=”no” class=””]
[su_dropcap style=”flat” size=”2″ class=”” dropcap_color=”#fa5738″]3[/su_dropcap]
Step
To create curves, start on the outside edge of the wood with a table or band saw, and cut along the marked lines. To create a full circle, drill a hole through the wood first and then place your jigsaw into the hole and begin cutting along the marked lines.
[/su_column]
[su_column size=”1/2″ center=”no” class=””]
[su_dropcap style=”flat” size=”2″ class=”” dropcap_color=”#fa5738″]4[/su_dropcap]
Step
Without the router, the curve cut is going to be rougher along the edges. You will need to sand it down using a hand plane or a sander to get smooth, rounded edges around the curves.
[/su_column]
[/su_row]