Contents

Cutting a groove in wood comes with several purposes. And since wood is highly adaptable, you can achieve your desired effect with or without common power tools or basic hand tools.
Grooves can be cut to serve functional or decorative purposes. In cabinets and shelves, grooves or channels serve aesthetic benefits whereas, in handles, they are meant to provide support. Grooves are also popularly known to hold panels in door frames.
In this post, you’ll learn how to cut a groove in wood using/without using a router. Most woodworkers depend on the router, the most common power tool for carving shapes in woods. But who says you can’t cut a groove in wood without a router?
While a router sure makes the process easier and faster, you can use alternative tools if you can’t lay hold of a router at the time you’re working.
So take some time to read through our no-router solution for cutting grooves in the wood.
Required Tools for Cutting a Groove in Wood
First, it’s important to state that woods are available in various forms. Hence it’s vital that you decide on the best wood to cut a groove into. When you get the wood right, other tools will work naturally to produce the results you need.
Besides the famous router, there are other tools that come in handy when deciding to cut a groove in wood. These include:
[su_spoiler title=”Required Tools for this Project:” open=”yes” style=”simple” icon=”plus” anchor=”” class=””]
[su_list icon=”icon: arrow-circle-right” icon_color=”#4f8901″]
[su_row class=””]
[su_column size=”1/2″ center=”no” class=””]
- The Wood You intend to Cut
- Hammer
- Sharp-edged knife/blade
- Handsaw
- Thick Pencil
[/su_column]
[su_column size=”1/2″ center=”no” class=””]
- Spare wood/Spacers
- Chisel
- Measuring Tape
- Masking Tape
- Sandpaper
[/su_column]
[/su_row]
[/su_list]
[/su_spoiler]
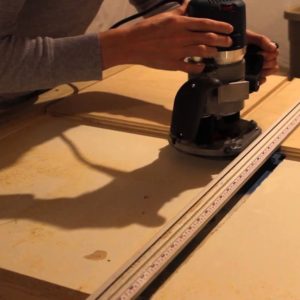
How to Cut a Groove in Wood with a Router
Cutting a groove in wood with a router seems like popular knowledge. This process saves time and requires little effort besides imagination and care. But we’ll take some time, nonetheless, to remind you of how it works.
[su_divider top=”no” style=”default” divider_color=”#444″ size=”3″ margin=”15″ class=””]
[su_dropcap style=”flat” size=”2″ class=”” dropcap_color=”#fa5738″]1[/su_dropcap]
Make Clear Marks on the Wood
[su_divider top=”no” style=”default” divider_color=”#444″ size=”3″ margin=”15″ class=””]
[su_row class=””]
[su_column size=”1/2″ center=”no” class=””]
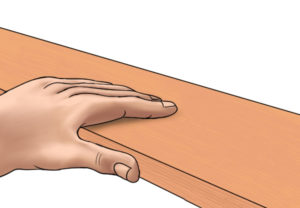
The very first step involved in cutting a groove in wood with a router is deciding what area you want to cut. Spend time measuring the exact area you want to channel into and make marks using a sharp pencil. You can also thicken the area with a sharp knife.
[/su_column]
[su_column size=”1/2″ center=”no” class=””]
[/su_column]
[/su_row]
[su_divider top=”no” style=”default” divider_color=”#444″ size=”3″ margin=”15″ class=””]
[su_dropcap style=”flat” size=”2″ class=”” dropcap_color=”#fa5738″]2[/su_dropcap]
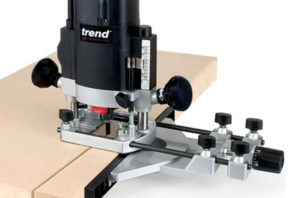
Choose Your Preferred Router Model
[su_divider top=”no” style=”default” divider_color=”#444″ size=”3″ margin=”15″ class=””]
[su_row class=””]
[su_column size=”1/2″ center=”no” class=””]
Next, select your router model. Routers come in different models with slightly different speed controls and attachments. So be sure to pick a product that you’re more comfortable with and that allows you to work without any difficulty.
[/su_column]
[su_column size=”1/2″ center=”no” class=””]
[/su_column]
[/su_row]
[su_divider top=”no” style=”default” divider_color=”#444″ size=”3″ margin=”15″ class=””]
[su_dropcap style=”flat” size=”2″ class=”” dropcap_color=”#fa5738″]3[/su_dropcap]
Select the Right Attachment
[su_divider top=”no” style=”default” divider_color=”#444″ size=”3″ margin=”15″ class=””]
[su_row class=””]
[su_column size=”1/2″ center=”no” class=””]
Before cutting the groove in the wood, carefully go through the attachments for the router. Your choice of attachment should depend on how deep or long you want the channel to be.
Also, assemble your router correctly to avoid mistakes or prevent accidents.
[/su_column]
[su_column size=”1/2″ center=”no” class=””]
[/su_column]
[/su_row]
[su_divider top=”no” style=”default” divider_color=”#444″ size=”3″ margin=”15″ class=””]
[su_dropcap style=”flat” size=”2″ class=”” dropcap_color=”#fa5738″]4[/su_dropcap]
Repeat the motions
[su_divider top=”no” style=”default” divider_color=”#444″ size=”3″ margin=”15″ class=””]
[su_row class=””]
[su_column size=”1/2″ center=”no” class=””]
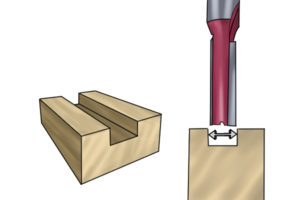
Having selected the ideal attachment for the router, set it to the marked area and gradually make the motions until the groove begins to appear. Repeat the motions carefully until you have your desired groove length and depth.
Safety is essential when creating a channel with a router as routers tend to be fast and their motors are super-efficient.
[/su_column]
[su_column size=”1/2″ center=”no” class=””]
[/su_column]
[/su_row]
How to Cut a Channel/Groove in Wood without a Router
Reading the earlier section might make this section unnecessary. But here’s the deal:
If you don’t have a router within your reach when you’re working on wood, you might feel uncertain about what steps to take. However, it’ll be good to learn alternative ways to cut a groove in wood without a router.
[su_divider top=”no” style=”default” divider_color=”#444″ size=”3″ margin=”15″ class=””]
[su_dropcap style=”flat” size=”2″ class=”” dropcap_color=”#fa5738″]1[/su_dropcap]
Make a Spacer out of Scrap/Spare Wood
[su_divider top=”no” style=”default” divider_color=”#444″ size=”3″ margin=”15″ class=””]
[su_row class=””]
[su_column size=”1/2″ center=”no” class=””]
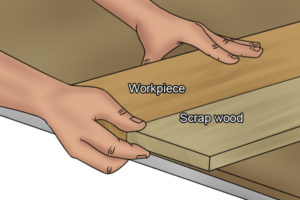
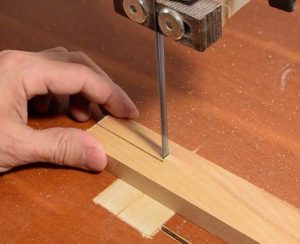
Before going on to cut the groove, you need to make a spacer to fit into the groove. The spacer serves as a barricade for the wood, as it reduces movement. The thickness of the spacer should be nearly the same as a blade’s since this guides the cutting that’s to follow.
[/su_column]
[su_column size=”1/2″ center=”no” class=””]
![]()
[/su_column]
[/su_row]
[su_divider top=”no” style=”default” divider_color=”#444″ size=”3″ margin=”15″ class=””]
[su_dropcap style=”flat” size=”2″ class=”” dropcap_color=”#fa5738″]2[/su_dropcap]
Add Marks to the Wood for Precision
[su_divider top=”no” style=”default” divider_color=”#444″ size=”3″ margin=”15″ class=””]
[su_row class=””]
[su_column size=”1/2″ center=”no” class=””]
It’s safe to mark the area you intend to cut. Note that the groove depth has to be patterned after the blade depth. Hence, it’s important that you apply caution here.
Use a pencil to note the areas you’re going to channel through. If you’re focused on making a straight line, use a straight edge for the groove.
[/su_column]
[su_column size=”1/2″ center=”no” class=””]
[/su_column]
[/su_row]
[su_divider top=”no” style=”default” divider_color=”#444″ size=”3″ margin=”15″ class=””]
[su_dropcap style=”flat” size=”2″ class=”” dropcap_color=”#fa5738″]3[/su_dropcap]
Use the Handsaw for the First Cutting
[su_divider top=”no” style=”default” divider_color=”#444″ size=”3″ margin=”15″ class=””]
[su_row class=””]
[su_column size=”1/2″ center=”no” class=””]
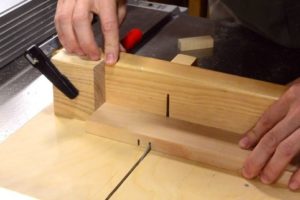
Now that you’ve marked the groove area, place your handsaw directly on that area and make your cuts. Ensure that the wood is clamped to the table and the spacer is placed at the fenced area. When everything is in place, make the cut.
The big advantage of the handsaw is that you can set the blade to the right depth which you want in the wood. However, be sure to avoid the blade area.
[/su_column]
[su_column size=”1/2″ center=”no” class=””]
[/su_column]
[/su_row]
[su_divider top=”no” style=”default” divider_color=”#444″ size=”3″ margin=”15″ class=””]
[su_dropcap style=”flat” size=”2″ class=”” dropcap_color=”#fa5738″]4[/su_dropcap]
Make Other Cuts
[su_divider top=”no” style=”default” divider_color=”#444″ size=”3″ margin=”15″ class=””]
[su_row class=””]
[su_column size=”1/2″ center=”no” class=””]
You can gently make other cuts once the first one has been made. However, you no longer need the spacer for restrictions.
Repeat the cuts until you have everything you need to have the groove in the wood.
[/su_column]
[su_column size=”1/2″ center=”no” class=””]

[/su_column]
[/su_row]
[su_divider top=”no” style=”default” divider_color=”#444″ size=”3″ margin=”15″ class=””]
[su_dropcap style=”flat” size=”2″ class=”” dropcap_color=”#fa5738″]5[/su_dropcap]
Chisel out Waste
[su_divider top=”no” style=”default” divider_color=”#444″ size=”3″ margin=”15″ class=””]
With the aid of a chisel, you can scrape out waste of the wood created during the cuts. Worthy of note is the fact that the chisel can be paired with a hammer to carry out this groove-cutting process. You’ll only need to work in bits and cut the wood in small amounts rather than in large measures.
[su_divider top=”no” style=”default” divider_color=”#444″ size=”3″ margin=”15″ class=””]
[su_dropcap style=”flat” size=”2″ class=”” dropcap_color=”#fa5738″]6[/su_dropcap]
Polish the Groove
[su_divider top=”no” style=”default” divider_color=”#444″ size=”3″ margin=”15″ class=””]
When you have successfully cut the groove in wood, it’s necessary to finish your woodwork with sandpaper to smoothen the groove base.
The Bottom Line
What you’ve read about cutting a groove in wood with or without a router is practical and easy-to-do. If you have a router within your reach, you could save yourself the stress of using the handsaw. But it’s certainly true that you can cut a groove in wood without a router.
Follow the steps described above and you’ll well be on your way to achieving your desired groove or channel in wood.
Which of these methods work for you? Feel free to share your thoughts!